Showing posts with label craft. Show all posts

Friday, September 19, 2014

DIY Tire Sandbox - for Free


Tires are great for upcycling! I've gathered some for a couple of projects and was ready to re-repurpose one just in time for Sasha's birthday party. I got this particular idea from Suzy Homeschooler.


In case you didn't notice or see it in the photo, there is cardboard under the tire. (This idea comes from my garden.) The corners stick out a little bit. The cardboard helps keep the grass out (for a while, at least) and still drains water out of the dirt. I added some dough shaping toys and a sand shovel (which I knew couldn't handle the dirt I used - it broke).


Spencer was the first to play in the "sandbox." I actually used my garden dirt mix, which includes some top soil and hummus, too. I mix it myself and it was what I had on-hand. I used the very last of it, but I've had it for over a year! I'd think you could literally dig up some dirt from your yard, if you have an area with extra. You could, of course, use sandbox sand.


One of the dads at Sasha's party even spent quite a bit of time rolling this perfect dirt ball. Or three. Don't be afraid to get dirty!


This is what the dirt box looked like the next day. There were plenty of people playing with it. I had to dig our some extra kitchen spoons for digging. Toys became buried treasure... more seats were gathered. I love milk crates!

I was so excited to have completed this backyard play feature in time for the party. And for free! Do you have a favorite backyard upcycle idea?

Friday, November 15, 2013

Upcycle Project

I do. not. have a Pinterest account. [gasp!] However, I did see someone share this on Facebook:


Simply cut out the mesh, being careful to not cut on supporting
seams. Add sheets/blankets and you have a toddler bed or reading
tent! The fitted sheet on top is simply held by the mobile that
came with it. Extend the life of your Pack n Play and save money.


Hey, I have one of those things! I shared and held onto the idea and bided my time... It turns out, Spencer never really cared for our Pack 'n Play at all. He was probably just never put in it regularly enough. Sasha spent more time in it as a baby. So I was finally ready to dig into this project!


I started with a box knife, but found scissors were actually much easier to control and I was still able to just slide them through the mesh. You do not want to cut the supporting fabric around the mesh!


Added a folded quilt and it quickly became a nice, protected napping spot.

Sasha also loves to play in it. To keep Spencer from rolling out in his sleep, I tuck a neck pillow under the edge of the quilt.

I mistakenly purchased a twin sheet first, but this is a crib sheet stretched atop the mobile arm that came with the Pack 'n Play. (I got each sheet for about $3 at a local thrift store.) The mobile itself is unnecessary. Notice that my topper looks nothing like the one from Pinterest. Surprised? I did find more on Pinterest that looked like mine, though!


Crib sheet atop the mobile.

The cool thing about using this as sleep space is that if you travel, this folds down small. You can have a familiar sleeping space for your little one no matter where you go! I'm wondering / considering whether I can insert the changing table piece and put some plushies in there. I haven't tried that.


Cosleeping arrangement (with me on the floor)

Sasha and Spencer roll around, wrestle and giggle their heads off in this thing! Sometimes they play through one mesh side. Sometimes Spencer spins in circles in it, giggling all by himself. I can make a pallet next to it and "cosleep." I may try it next to our bed at some point, which would definitely keep him from rolling out, I think I'll have to take the top off for that, though. Its awkward enough trying to put him down asleep through the side without it being blocked.

This was seriously the easiest project ever! If you're sure you won't need your Pack 'n Play again (or have a spare), I definitely recommend this upcycle. It can be a reading nook, fort, carriage, whatever. You and your children are only limited by your own imaginations!

What other baby products have you found ways to upcycle for longevity?

Thursday, October 24, 2013

Do you love Halloween?

When I was first offered a Ghost-a-House kit for review, I thought it sounded fun... sure! Then it arrived and looked exactly as shown online. (That is always a good sign, right?) But then I worried... how in the heck do I do a review of a product that I have to pass along to other people?! I worried whether the person I "ghosted" would follow through and about having enough friends in common to do this thing. I finally decided to "ghost" friends from one of my mom groups. (I won't say which one, so they will still be surprised. If the photo below doesn't give it away, that is.)

Sasha "helped" me assemble our ghost yesterday. It was pretty fun to put together! Daddy helped me name our ghost (Bradley Boo). Then I decided I really had to get out there immediately! No more procrastinating. I don't usually go out after dark, but the head of the ghost blinks. You gotta do it after dark! I was getting giddy at the idea of it! As soon as Sasha was in bed, I grabbed Spencer and headed out the door (leaving my teen and Daddy home, too - no worries).

I could not stop grinning the entire drive! I absolutely got an adrenaline rush as I headed to my friend's house! Its like doing something sneaky... in the dark... but kind! How crazy! This was so much more fun than I even thought it would be!


Photo Credit: Kalyn of A Surprising Joy

I had made sure her husband wasn't away on business, as I didn't want to scare anyone by knocking on their door after dark, unannounced. I parked my van, dimmed my lights and snuck up to the well-lit porch. I really wanted to hang Bradley in a spot you could see from the door, but was also trying to be quick. I wound up hanging him on the handle, just like they show in the packaging. I knocked ever-so-gently, so as not to risk disturbing any little ones that might be working on bedtime. And then... I sprinted back to my van! It was hilarious!

But no one opened the door. I texted my friend, "Psst. Was that a knock at your door?" This still makes me laugh! Her husband had looked out the door, but not seen anyone! I advised they should open the door and check. Meanwhile, I had backed up one house down the road and had my lights all turned off, stalker-style. I wanted to make sure that they didn't get the ghost but miss the goodie bag or whatever. Maybe I fret too much. She didn't miss a thing!

Knowing my friend (and her husband) were fans of Halloween, they were a perfect choice for our first haunting! I prefer the term haunting, but can see why the company chose a less frightening term. This is a very family-friendly activity. I love the idea of having invitation delivery be your ghost's mission. (You get to define your mission.) I just offered a bag of candy plus the door tags included. The kit provides a booklet where you can write in the list of people to haunt. My friend is looking forward to doing her own ghosting tonight!

But wait, I spend this money and then don't get to keep anything? Actually, the booklet asks the last person ghosted to please return the ghost, bag and tracking tag to the original ghoster! This would be especially convenient if the game involved invitations, then the kit could be returned at the party. You can print new lists online, so you could absolutely reuse the kit again each year!


Orange house is me.
White ghosts are people on my list not "ghosted" yet.
The orange-ish ghost is my first victim.

Oh! And did I forget?! This comes from a company that makes GPS units! This is a geocaching-related product. So when your friends get online and track where the ghost has been, you get an email notice that they have the ghost - complete with map!

You get:
  • Kit to make your ghost with...
  • LED lantern kit for head
  • Heavy Duty Goodie Bag
  • Registration Tag
  • Mission Sheet
  • Instructions
  • 12 Door Hangers
This product is actually ON SALE right now through the website! You can purchase your own kit for $16.95. You can also find one locally.

Disclosure: I received Ghost-a-House for review, free of charge.
I only seek out products that I believe will be of interest to my readers.
If I don't like a product, I won't be recommending it to you.

Friday, January 11, 2013

Snack Shelf

I love the idea of having a snack cabinet / drawer / shelf for kids that they can access themselves. So once we got into our new kitchen, I put all the kid-friendly snack food stuff that we keep on hand on the bottom shelf of the pantry. Sasha can open doors now, so when she is hungry I can send her in there to see what looks good.

I've had an issue, though. Sasha loves to eat frozen peas. Every time I serve peas at dinner lately, she insists on having some frozen on the side. And I don't keep the fresh fruit in the pantry. Then there are the grapes in the fridge... So I had an idea.

Friday, August 3, 2012

Dreadlock Sleep Solution +

Last week I promised to share my comfortable sleep solution. Here it is:


Please forgive that these were taken first thing in the morning.

This is a really easy solution and it is an upcycle project! I took an old t-shirt and cut off the sleeves just outside the seam. I put one sleeve on wrong side out so that the seam that goes down you arm doesn't press into my neck. The arm pit part is the shortest, so you put that in the back. Slide it over your head and pull your hair through. Then slide it over your face until you get it where you want it.


You can even see lines from the sheet imprints.

You could decorate this with fabric paint or dye. You could any sort of t-shirt you liked and add appliques or iron-on designs. This could be used as a fashion accessory, not just a dread sleep cover. I've worn mine out of the house, too. The only problem mine has is that my dye has rubbed off on it.

I actually have two of these (go figure), but the other one I snipped more. If your sleeve is too tight for your head you might need to try a larger size shirt. You can also just snip the band a little in the back to loosen it up. I tried that, but preferred the solid sleeve.

I'm still loving the Knotty Boy Dreadlock Wax Roll-up Stick. It is really easy to just rub it down my dreads. I'm sure I'll try the old style wax eventually... but probably not until this stick runs out. It is so easy to use!

Here's my latest favorite do!


This is a simple pony tail that I've pulled most of the way through a second time.
I like this style without dreadlocks, too.

I haven't had any more trouble with itchy scalp, despite the Summer heat, since using the vinegar spray one time. I've also gotten more thorough with the Knotty Boy Dreadlock Shampoo Bar and I make sure to let it sit for a few minutes before rinsing.

Wednesday, January 11, 2012

Wordless Wednesday: Family Cloth Tutorial

Family Cloth - Tag: 100% cottonChoose a fabric that is 100% cotton. You want something soft, but absorbent. Do not use fleece! When in doubt, drip a few drops of water on your fabric... does it absorb or roll off?

I opted to upcycle a set of 3 coordinating receiving blankets from when Sasha was a baby. For my second batch, I did the same with a set of 2 coordinating receiving blankets.

Monday, December 5, 2011

Monday Minimalist: Giftmas

Tis the season to spend the big bucks, right? How can you save money during the holidays. After all, you can "minimize" your spending as well!

Electricity

I understand the desire for Christmas Lights. However, do you need them everywhere? And do you leave your lights on all night long? Put them on a timer or shut them off when you go to bed. Keep your electric bill from going up during the holiday. Also, take the lights down after the holiday!


Decorations

No one needs new decorations each year. I know plenty of people that basically collect the stuff! We've actually gotten rid of all of our decorations (it wasn't a LOT anyway) except for a handful of sentimental ornaments, stockings for each of us, and hangers for the stockings.

Do you have some additional space that needs decorating? Or perhaps you have a desire for new decorations. Craft them! Paper chains and strings of popcorn are fun!

Commercialism / Gifts

The retail industry wants you to think that $ = ♥. You do not have to spend a specific amount of money to show that you love someone a particular amount or more than someone else. That sort of competition honestly a little sick, in my opinion.

Budget

Consider how much you actually want to spend for the holiday (your entire gift budget). Then you can determine how to split that among your recipients. In fact, really look over that recipient list, too. Do you really need to give to everyone on your list? My list has gotten much smaller over the years, but that is partially due to divorce. (I'm not suggesting you get divorced just to save a buck.)

Longevity

Especially when debating gifts for children, think about the longevity of the item. I don't just mean the quality, but also the attention span it will pull. You could also avoid battery operated toys because they cost more money down the road. There are so many options out there that do not require electric or battery power.

Add-on Toys

Another possible way to save money is add-on toys. If the child (or even an adult) has a set of some kind (building blocks, race tracks, etc.), you can get additional cars, tracks, or blocks for the set. This will likely cost less that starting from scratch with a new toy. I've also seen this done with pearl necklaces for girls. A single pearl is added each year.


Homemade

Then, of course, there are homemade gifts! A box or tin full of homemade cookies or fudge are great! Plus, they don't take up space permanently. You could also make reusable shopping bags. There are a TON of possibilities when it comes to making gifts, even for kids. A couple of years ago, I used a bunch of old jeans pockets to make purses for the little girls on my list. I even embroidered their initials or a cute picture on them and added a snap closure! Using the pockets meant minimal actual sewing!

Practical

How do you feel about practical gifts? I know most kids don't want to receive practical stuff, but some really do like it! I especially like practical gifts within our household. If your kids get store bought presents for Mom & Dad, consider using the opportunity for practical stuff. I feel like this doubles the bang for your buck. Hubby needs thermals for work, but it gets put off for other expenses... daughter can give them to him as a gift! Now you've used gift budget, but fulfilled a gift expense and a regular upkeep expense!

Regifting

Regifting can be a dangerous option. I actually keep a spreadsheet of gifts I've given (and money I've spent) for Giftmas so I can make sure I don't get someone the same gift I've gotten them before. This also comes in handy for regifting. If you receive an item that just doesn't suit you, you can often return / exchange it. If you can't do that, you can totally save it for regifting! Just be careful that you don't give it back to the same person or household.

Previously Owned

How do you feel about used gifts? Some items are easier to get quality used items than others. Used books, for instance. You can even shop for them online and find out the condition before choosing to purchase. You could also go the used option with classic toys or vintage clothes. Yes, some toys are available in redesigned versions, but how much would your adult friend love to get an old, original Game of Life or Light Bright? Sometimes the oldness of an item is precisely the charm!

DIY Gift WrapClick Image for Photo Credit
and explanations of each gift wrap.

Gift Wrap

My grandmother used to love to save everyone's wrapping paper and reuse it. It seemed silly while everyone was unwrapping their gifts, but I had to admit... I loved the way the sheer variety of paper looked under her tree! These days you can get really cheap gift wrap, but you really do get what you pay for. The cheap stuff often rips before you can get the gift to the recipient!

Foil

Aluminum foil is an original idea that I love. You have options, too. You can leave it flat, you can crinkle it, you can use the shiny side or the dull. However, I really don't think it is cheaper than gift wrap. It also isn't less wasteful than any other option. It is handy for times when you just don't HAVE any wrapping paper.

Brown paper

Sound boring? I've done brown paper, tied with string, and then used a stamp set to address it like shipping. You could also use stencils or shipping stickers/address labels. I think these make very attractive gifts.

Newspaper

I have always loved the idea and the look of using the Sunday Comics (the one day the funnies are in color) as wrapping paper! This is a great way to reuse, if you already get the paper.

Gift Bags

I've long seen gift bags as the cop out of the gift giving practice. Gift bags are so much easier to "wrap," but they are nowhere near as fun to open! I have known a lot of people that save them and reuse them, though. I did but then gave them all away in a minimizing fit! That said, I have another gift bag option for you: Wrap Sacks! These are cloth bags you can buy that include individual codes. You can enter the code into the website to track your bag through re-gifting! Each person can enter the code and see where the bag originated and where it has gone. I think this is such a fun idea! Alternatively, you can make your own cloth gift bags as well. One year I made cloth pouches and gave nieces and nephews marbles in them. They made great little carry bags for the marbles. In this way, you can make the wrapping a part of the gift.

Butcher Paper

You can use plain white paper or butcher paper to wrap your presents. Kids love to decorate presents like this! They (or you) can use stickers, markers, stencils, whatever! The great thing about butcher paper is you could also use water colors! I made some gorgeous presents that way, but I found I had to re-wrap with wax paper over them because they came out sticky. The added wax paper made for a gorgeous finish! This option is cheap, but not the greenest option if you have to wrap twice.

Gift Tags

This is another place where paper gets wasted. What creative alternatives could you use? I love the idea of attaching a mini-gift as part of or a replacement for the gift tag. Perhaps you have one relative that collects... Bugs Bunny. Attach a Bugs Bunny key chain as the gift tag. You know who it is for (though perhaps others won't pick up on the idea right away). You can always claim to be the gift giver rather than having to write your name on a tag. You could also make Shrinky Dink key chains, zipper pulls, etc. that double as gift tags.

Some of the gift wrap options I mentioned above lend themselves to writing the gift tag directly on the package. Foil, brown paper, butcher paper, etc. all offer this option.
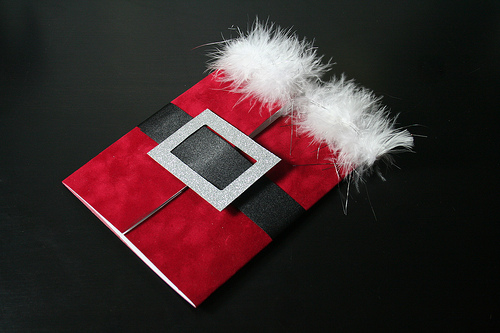
Santa Greeting CardClick image for Photo Credit and Tutorial Details.

Holiday Cards

There are plenty of options here. You can have special cards printed, which is much cheaper if you go with a site like Vista Print. You could also make or have your kids make cards, though! You could do a family newsletter instead of buying cards. Better yet, a family newsletter could not only become an annual tradition, you could offer it digitally (instead of on paper + mailing costs) to those with the capability. Personally, I just don't do cards... for any holiday. If I approach the greeting card section in a store, I get sucked into it. I can't stop reading them until I've spent all day there!

How do you make it through the holiday without breaking the bank?
And don't forget that you can recycle paper giftwrap!

Momma Jorje: Monday Minimalist
Let me know if you have a Monday Minimalist post and I'll share it on my blog.

Click the icon to grab the button for your MM posts or for details on how to join the movement.

Thursday, October 13, 2011

Vacation Weekend with Volunteers

On the weekend of October 8 some of the amazing women and men who work hard to make Natural Parents Network the wonderful community and resource that it is got together for a meet-up at two locations across the U.S. — the Midwest and the Northwest. This was the first time that many of the volunteers have met in person after a year of collaborating on this amazing website. Please scroll to the bottom of this post for a list of links so that you can read what some of the other volunteers had to say about this incredible First Annual Natural Parents Network Team Get-Together!


It had been in the planning for months! As the date approached, my husband wanted me to admit (and realize) that we might not be able to afford the trip, but I was determined! This was just the light at the end of the tunnel / vacation I needed! Camping was great, but it was only one night.

It was a full weekend get together of volunteers from Natural Parents Network! A chance to meet all these internet friends... IRL! There were lots of confessions leading up to it, mostly people worried about meeting. Just like online, though, no one judged.

Midwestern Volunteer GatheringMost of our group.

With my first impressions of our arrival to our hosts' home running through my mind, it feels like it will sound like a hotel review! It was just really, really cool to see a real person using cloth "toilet paper," unpaper towels, and actually sorting garbage into recycle bins! Either she just re-organized how she handles these things or she is the real green deal!

Sunday, October 2, 2011

Sunday Surf: With Crafts!

I bought Sasha some finger paint a few weeks ago and finally let her use it this week! She paints using a brush with her sister, so I let her use a brush, too. She covered the paper with orange, then I gave her red, then blue. She had a great time. The next day she kept asking for "red" (with sign and word) and it took me another day to figure out she meant paint!

That was just a tidbit from our week. Here are some links!

  • Wow, just wow! Several news stories about Whooping Cough outbreaks where everyone involved was vaccinated but still got sick!

  • Did you know that TLC Tugger offers a free Your-Skin Cone to dads-to-be?? (This is a tool used to reverse some of the effects of circumcision.) Not only do you get the product for free, they include waterproof ankle bands with the words "DO NOT circumcise or retract" for your infant to wear while in the hospital! I've been trying to sell my husband on reversing his circumcision, but also really want those ankle bands for our son!


  • In my recent search for the right / affordable Cloth Diaper solution for my family, I came upon this link. The post offers a handful of ways to get started with cloth diapering for under $100. The links within are all for EverythingBirth.com... I already have a friend that does Everything Birth, so if I order anything it'll be through her. I'll be doing a virtual consultation with her soon, but have been hoping to get enough stuff as gifts before Spencer is born.

  • Next weekend I'll be doing a crafting project with a group. We're going to be doing Freezer Paper Stencils. I don't think I'm great with an x-acto blade, but we'll see how it goes. We got some nice thick onesies, so now we just need to decide on a design or two.

  • Here is one idea I found that would go well with our upcoming Buddy Walk. This woman didn't use Freezer Paper, but still... this could make for a cute template.

  • I'm waiting for the right opportunity to sit and watch some of the 30 Natural Birth Videos and Slideshows to Prepare Children for Labor and Birth provided in a recent Code Name: Mama post.

I hope you enjoyed some of my links. What have you been reading this week?

Related Posts Plugin for WordPress, Blogger...